Introduction
You have exactly 2 seconds to capture a shopper's attention on a crowded retail shelf. In that brief window, your packaging must communicate your brand, convey your product's benefits, and compel someone to pick it up—all while competing with dozens of other products screaming for the same attention.
Successful retail packaging isn't just about looking attractive. It must balance three critical elements: regulatory compliance that keeps you legal, eye-catching design that drives sales, and functional durability that protects your product through the supply chain.
Miss any of these, and your product won't make it to—or stay on—retail shelves.
Getting all three elements right can seem overwhelming, especially for first-time entrepreneurs. This guide walks you through the complete packaging process, from understanding retailer requirements to final testing before production. Whether you're launching your first product or expanding an existing line, these techniques help you avoid costly mistakes and create packaging that converts browsers into buyers.
Key Takeaways
- FDA labeling requirements (ingredient lists, net quantity, warnings) must be met or retail distribution is blocked
- Use color psychology and visual hierarchy for instant shelf recognition from 10+ feet away
- Material choices affect cost, sustainability appeal, and product protection—match packaging to your product type and target retail environment
- Real-world testing under store lighting and shelf conditions reveals problems before expensive production runs
- Low minimums (500-unit orders) let start-ups test retail markets without major upfront investment
Step-by-Step Process: How to Package Your Product for Retail
Step 1: Understand Your Target Retail Environment and Requirements
Before designing anything, identify exactly where you want your product sold. Big box retailers like Target and Whole Foods have dramatically different requirements than independent specialty shops or health food stores.
Start by researching your target retailers:
- Visit stores and photograph competitor products in your category
- Note shelf dimensions, typical product sizes, and spacing
- Document required certifications (organic, Fair Trade, cruelty-free)
- Review retailer vendor manuals for specific packaging requirements
Target mandates GS1-128 SSCC barcode labels and limits carton weights to 60 lbs maximum. Whole Foods prohibits non-biodegradable packing materials and enforces a 50 lb maximum.
These aren't suggestions—they're gatekeeping requirements that determine whether retailers will accept your shipments.
Next, analyze what's working on shelves:
- Identify which packages catch your eye first and why
- Note common design patterns in your category (colors, layouts, messaging)
- Look for gaps—what's missing that your product could fill?
- Photograph successful packaging for reference during your design phase
Finally, determine your positioning. Your product's price point directly influences packaging quality expectations. Premium products require premium packaging that justifies higher prices, while value products need cost-effective solutions that still protect and present well.
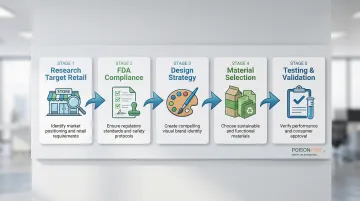
Step 2: Ensure FDA Compliance and Legal Requirements Are Met
For personal care and household products, FDA compliance isn't optional—it's the foundation of your packaging. Unlike food products, personal care items don't require nutrition facts panels, but they have their own strict labeling requirements.
Required labeling elements for cosmetics and personal care:
| Element | Requirement | Location |
|---|---|---|
| Identity Statement | Product name or description | Principal Display Panel |
| Net Quantity | Weight, measure, or count | Principal Display Panel (bottom 30%) |
| Ingredient Declaration | Listed in descending order by weight | Information Panel |
| Manufacturer Information | Name and address | Information Panel |
| Warning Statements | Required for hazardous products | Principal Display Panel or Information Panel |
Critical compliance steps:
- Use proper INCI (International Nomenclature of Cosmetic Ingredients) names for ingredients
- List all ingredients in descending order by weight concentration
- Include warning statements for products containing hazards (aerosols, certain chemicals)
- For household cleaners under the Federal Hazardous Substances Act, add cautionary labeling like "DANGER" or "CAUTION" with first aid instructions
Obtain legitimate UPC barcodes by purchasing GTINs directly from GS1—not from resellers. Retailers require authentic GS1 barcodes, and each product variant needs its own unique code. Using unauthorized barcodes can result in retailers refusing your products.
Manufacturers experienced in FDA compliance can help you navigate these requirements correctly from the start. For example, working with an FDA cGMP-compliant facility ensures you avoid discovering violations after printing thousands of labels.
Step 3: Develop Your Design Strategy and Visual Identity
Design determines whether shoppers notice your product in that critical 2-second scanning window. Effective packaging creates a clear visual hierarchy that guides the eye from brand recognition to key benefits to purchase decision.
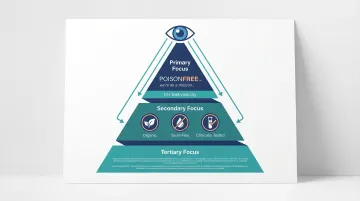
Create visual hierarchy:
- Primary focus: Brand logo and product name should dominate—identifiable from 10+ feet away
- Secondary focus: Key differentiators like "organic," "toxin-free," or "clinically tested"
- Tertiary focus: Supporting information and legal text, readable but not overwhelming
Leverage color psychology strategically. Research shows warm colors reduce time-to-first-fixation by 420 milliseconds compared to cool colors. High-contrast packaging improves fixation duration by up to 32%, keeping shoppers engaged longer.
Consider category conventions—natural products often use earth tones and kraft paper aesthetics, while clinical products favor white and blue.
You can either align with these patterns for instant category recognition or deliberately break them to stand out.
Design for the "billboard effect":
- Use bold typography that's legible from across the aisle
- Limit text on the principal display panel to essentials
- Create consistent visual elements across product variants so multiple SKUs create a unified brand block on shelves
- Test designs in black and white to ensure they work even without color
Shelf placement considerations: If your product sits on lower shelves, top-visible branding matters most. For eye-level placement, the front panel is critical. Understanding typical planogram layouts for your category helps you optimize design for actual retail conditions.
Step 4: Select Appropriate Materials and Structure
Material selection impacts everything from product protection to sustainability appeal to final costs. The right choice balances functional requirements with market expectations and your budget realities.
Match materials to product needs:
- Barrier properties: Products sensitive to light, oxygen, or moisture need appropriate barriers (amber glass, metalized films, HDPE)
- Rigidity: Fragile products require rigid packaging; stable products can use flexible pouches
- Sustainability features: 73% of consumers prefer brands with sustainable packaging—recyclability consistently ranks as the most important trait
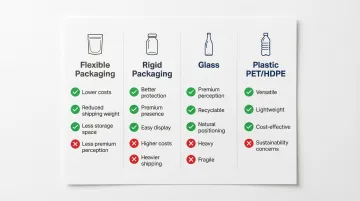
Material trade-offs:
- Flexible packaging (pouches, bags): Lower material costs, reduced shipping weight, less storage space, but may lack premium perception
- Rigid packaging (bottles, jars, boxes): Better protection, premium shelf presence, easier to stack and display, but higher costs and shipping weights
- Glass: Premium perception, excellent for natural/organic positioning, recyclable, but heavy and fragile
- Plastic (PET, HDPE): Versatile, lightweight, cost-effective, with PET offering clarity and HDPE providing chemical resistance
Consider the total cost equation beyond material prices: printing setup fees, minimum order quantities, warehousing space requirements, and shipping weights all impact your bottom line. Starting with a manufacturer offering low minimums allows you to test materials before committing to large production runs—some facilities offer 500-unit minimums specifically for entrepreneurs testing new products.
Step 5: Create Production-Ready Files and Test Before Full Production
Even perfect designs fail if production files have technical errors or if you skip real-world testing. This final step prevents expensive mistakes.
Prepare print-ready files:
- Work with a packaging designer familiar with dieline specifications
- Account for bleed areas (typically 0.125" beyond cut lines)
- Establish safe zones keeping critical text and graphics away from folds and cuts
- Verify barcode placement meets size and quiet zone requirements
- Specify finishing options (matte, gloss, soft-touch, foil stamping)
Order sample runs and conduct real testing:
- Place samples on actual shelves under store lighting—colors and readability change dramatically under fluorescent lights
- Have people unfamiliar with your product provide unbiased feedback
- Test barcode scanning at multiple retailers using different scanner types
- Conduct drop tests and compression tests to verify durability through distribution
Pre-production checklist:
- ✅ Barcodes scan properly at multiple test locations
- ✅ All legal text reviewed by compliance expert or experienced manufacturer
- ✅ Colors match brand standards on actual production materials
- ✅ Structural integrity confirmed through shipping simulation
- ✅ Print quality inspected on final materials (not just proofs)
Most packaging failures happen because brands approve designs on computer screens without seeing physical samples under real conditions. What looks perfect on a monitor may be unreadable on a shelf or scan incorrectly at checkout.
Design & Branding Strategy: Making Your Product Stand Out
Strong branding extends beyond your packaging to create a cohesive identity across all customer touchpoints. Your retail packaging should feel connected to your website, social media presence, and any direct-to-consumer packaging.
Highlight Your Unique Selling Propositions
Your packaging must communicate what makes your product different within seconds. Position these differentiators strategically:
- Feature toxin-free, organic, or problem-solving claims in the top third of your display panel
- Use icons or badges for instant recognition (USDA Organic, cruelty-free, recyclable)
- Make claims immediately visible from 3-5 feet away
For products emphasizing clean ingredients—like toxin-free or petrochemical-free formulations—these USPs should dominate your principal display panel. Shoppers scanning crowded shelves need to spot your differentiators instantly.
Use Strategic Storytelling
A brief brand story creates emotional connection with shoppers encountering your brand for the first time. Keep it concise—2-3 sentences maximum on the primary display panel.
Place extended stories on secondary panels or inside packaging.
Incorporate Social Proof
Build credibility through visible trust markers:
- Certifications (USDA Organic, Fair Trade, Non-GMO)
- Industry awards and recognition
- Brief testimonials or "as featured in" mentions
Maintain Brand Consistency Across SKUs
When you offer multiple products, consistent visual elements create a "billboard effect" on shelves. Unified color schemes, typography, and layout patterns make your brand block instantly recognizable, even from across the store.
FDA Compliance & Labeling Requirements: The Non-Negotiables
Understanding the specific requirements for personal care products prevents costly recalls and legal issues. These regulations differ significantly from food labeling.
Nutrition Facts Panels are NOT required for cosmetics and personal care products—this is a common misconception. However, ingredient declarations are mandatory and must follow specific formatting rules.
Ingredient Declaration Requirements
Your ingredient list must follow FDA formatting rules:
- Use proper common or usual names (INCI names for cosmetics)
- List in descending order by predominance (most to least by weight)
- Include sub-ingredients for any compound ingredients
- Color additives must be specifically listed
While the "big 8" allergen warnings required for food don't apply to cosmetics, you should still clearly identify common allergens in personal care products (tree nuts, botanicals that may cause reactions).
Include "may contain" warnings if cross-contamination is possible in your manufacturing facility.
Net Quantity & Warning Statements
Net quantity statement specifications:
- Must appear on the principal display panel
- Font size requirements based on panel area
- Include both metric and US customary units for products over certain sizes
- Position in the bottom 30% of the principal display panel
Products containing certain ingredients or in aerosol form require prominent warning statements. These must be clearly visible and may need to appear on the principal display panel depending on the hazard level.
Register your manufacturing facility with FDA and maintain current registration.
If you're working with a contract manufacturer, verify they're properly registered and maintain FDA cGMP compliance. This protects you from regulatory issues that could halt production or sales.
Material Selection: Balancing Cost, Protection, and Sustainability
Your packaging material affects every part of your business—from manufacturing costs and shipping expenses to retail acceptance and consumer perception. The right choice protects your product while supporting your brand positioning and profit margins.
Match Materials to Your Product Type
- Liquids need leak-proof seals and may benefit from squeezable materials
- Powders require moisture barriers with sifter caps or shaker dispensers
- Creams and lotions: choose jars for thick formulas, tubes for medium consistency, or airless pumps for preservative-free products
- UV-sensitive ingredients require amber glass or opaque containers to maintain potency
Sustainability as Competitive Advantage
Research shows 51% of global consumers rank environmental impact as extremely or very important when making purchase decisions. Highlighting recyclable, compostable, or post-consumer recycled materials can drive sales, particularly in natural products categories.
Consumers consistently rank recyclability highest among sustainability traits. Focus on materials that fit established recycling streams in your target markets—PET bottles and cardboard boxes have higher recycling rates than complex multi-material pouches.
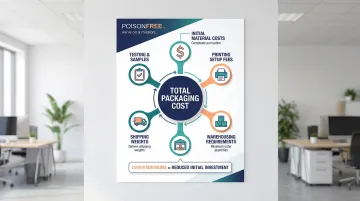
Factor in the Total Cost Equation
Sustainability matters, but your packaging must also make financial sense.
- Initial material costs: Price per unit at your order volume
- Printing setup fees: One-time charges for plates, dies, or digital setup
- Minimum order quantities: Higher MOQs tie up cash and warehouse space
- Warehousing requirements: Bulky packaging increases storage costs
- Shipping weights: Heavier materials increase freight costs throughout distribution
Starting with lower minimums allows you to test materials and gather real customer feedback before committing to large inventories. For example, Poison-Free Private Label's 500-unit minimum lets entrepreneurs validate packaging choices in real market conditions before scaling production.
Common Mistakes to Avoid When Creating Retail Packaging
Retail packaging failures often follow predictable patterns. Avoiding these common mistakes keeps your launch on track and on budget.
Skipping physical mockups: Colors, sizes, and readability look dramatically different in print under retail lighting than on computer monitors. Always order physical samples and test them in actual store environments before approving final production.
Underestimating lead times and MOQs: Rushing production to meet retail deadlines leads to expensive mistakes. Standard lead times for custom packaging range from 6-12 weeks depending on materials and complexity.
Include time for:
- Design revisions and approvals
- Sample production and testing
- Full production runs
- Shipping to your facility or directly to retailers
Using unauthorized barcodes: Purchasing barcodes from resellers rather than directly from GS1 can result in retailers refusing your products. Each product variant needs its own legitimate GTIN purchased from GS1.
Neglecting secondary packaging: Retailers need easy-to-identify shipper boxes with product information, UPCs, and quantities clearly marked for receiving and stocking. Target requires specific GS1-128 SSCC labels on all cartons.
Whole Foods mandates biodegradable packing materials and clear carton labeling with purchase order numbers and store information.
Ignoring manufacturer capabilities: Working with manufacturers experienced in retail packaging prevents technical failures. Manufacturers specializing in your product category understand compliance requirements and can guide design decisions that meet retailer specifications.
Overdesigning at launch: Special finishes like foil stamping, embossing, and complex die cuts can double or triple your packaging costs. Start with clean, effective designs using standard printing techniques, then add premium features once sales justify the investment.
Testing & Validation Before Full Production
Before committing to your full production run, testing catches costly mistakes early. Skipping validation means discovering problems after you've printed 10,000 units—when fixes become expensive.
Shelf & Customer Testing
Test how your packaging performs in actual retail conditions:
- Place samples among competitors on store shelves (or create mock setups)
- Check visibility from 10+ feet away—can shoppers spot your product instantly?
- Evaluate under fluorescent store lighting (it changes color perception dramatically)
- Get feedback from target customers seeing your product for the first time
Physical Durability & Compliance Testing
Physical durability testing:
- Drop tests simulate handling during warehousing and stocking
- Compression tests verify packaging survives stacking and shipping pressure
- ISTA 3A testing provides parcel delivery simulation recognized by FDA
- Environmental testing confirms performance under temperature and humidity changes
Barcode verification:
- Test scanning at multiple retailers using different scanner types
- Verify barcode quality meets ISO/IEC 15416 standards (minimum grade 1.5/C)
- Ensure proper quiet zones (blank space) around barcodes
- Check that barcode placement doesn't fall on folds or seams
Compliance review checklist:
- All required FDA labeling elements present and properly formatted
- Ingredient names follow proper naming conventions
- Net quantity statements meet size and placement requirements
- Warning statements included for hazardous products
- Manufacturer information complete and accurate
For cosmetics and personal care products, plan 2-4 weeks for complete testing and validation. This timeline covers shelf testing, durability checks, barcode verification, and FDA compliance review—preventing expensive recalls or rejected shipments later.

Frequently Asked Questions
What are the 5 P's of packaging?
The 5 P's framework evaluates packaging across five dimensions: Product (protection and containment), People (consumer appeal), Process (manufacturing efficiency), Performance (distribution functionality), and Perception (brand image and shelf impact).
What are the 3 C's of packaging?
The 3 C's are Communication (conveying product information clearly), Convenience (ease of use and handling), and Containment (protecting the product throughout its lifecycle).
What are the 5 P's of retail?
The retail 5 P's are Product (what you're selling), Price (positioning strategy), Place (distribution and shelf placement), Promotion (marketing visibility), and People (target customers and retail staff).
Do I need different packaging for different retailers?
Core compliance stays consistent, but major chains have specific requirements. Whole Foods mandates biodegradable materials, while Target has carton labeling and weight specifications that may require packaging variations.
How much does retail packaging typically cost for small brands?
Expect $2,000-$10,000 for design and first production run, with per-unit costs decreasing at higher volumes. Manufacturers offering 500-unit minimums reduce initial investment and enable market testing.
Should I hire a packaging designer or work with my manufacturer?
Experienced manufacturers often provide design services and understand compliance requirements, making them more cost-effective than separate designers. Poison-Free Private Label's 30 years of experience and FDA cGMP-compliant facility streamlines both design and regulatory compliance for new brands.